The Barn Build Challenge
Here's the honest pitch: this is the rare vacation activity where the grown-ups end up having as much fun as the kids. No screens, no batteries, no instructions to lose — just a barn, a pile of panels, and your people. Little ones bring the wild ideas ("let's make a rocket!"), taller people reach the roof, and everyone argues happily about where the door should go. It's teamwork you can feel: someone holds a wall, someone snaps the next panel on, and suddenly you're all standing inside a fort you built together. It's the kind of thing families remember long after the trip — the barn afternoon where you built a house big enough to sit in, crawled through a tunnel, or defended a castle. Toddlers can stack and snap, ten-year-olds can engineer, and adults can quietly out-nerd everyone on the roof design. Rainy day, lazy morning, post-lunch energy burn — pull out the tiles and see what your crew dreams up.
What you'll find in the barn
Out in the barn you'll find something wonderfully simple and completely addictive: a big pile of giant magnetic building tiles. These aren't the tiny tabletop kind — each panel is roughly kid-sized (about 20 inches on a side), made of fabric stretched over a light frame, only about 9mm thick so they're easy for small hands to carry and impossible to get hurt on. Every single edge is magnetic, so any edge snaps to any other edge, in any orientation — no right way up, no wrong way up. Just line two panels up and feel them click together.
There are six shapes in the pile, and once you know them you can build almost anything: - Squares (20" x 20") — your bread-and-butter walls and floors. - Window-Squares — a square with a round porthole cut in it, for peeking out. - Triangles — a square cut corner to corner; two of them make a square, and one makes a perfect roof gable. - Trapezoids — a wide angled panel (40" along the bottom, ~20" across the top) that's made for sloped roofs and A-frame walls. - Rectangles (40" x 20", two squares wide) — great for long tunnel tops, floors, and big spans. - Door-Rectangles — the same big 40" x 20" panel but with a climb-through opening, so you can crawl right inside.
Put them together and the structures get big — genuinely big enough to crawl inside, sit in, and hide in.
The six shapes (one set of 24 · you have five sets)
Square
20″ × 20″ · your walls & floors
10 per set · 50 in all
Window-Square
a square with a porthole
2 per set · 10 in all
Triangle
half a square · roof gables & fins
6 per set · 30 in all
Trapezoid
40″ base · sloped roofs & A-frames
4 per set · 20 in all
Rectangle
40″ × 20″ · long spans & tunnel tops
1 per set · 5 in all
Door-Rectangle
40″ panel with a climb-through door
1 per set · 5 in all
How the challenge works
There are 5 full sets in the barn — that's 120 panels in all: 50 squares, 10 window-squares, 30 triangles, 20 trapezoids, 5 plain rectangles, and 5 door-rectangles. That's plenty to build something huge, or two or three things at once for a little friendly competition.
You've got two ways to play. Pick one of the guided builds below — each one is broken into simple, base-up steps that tell you exactly which panels to grab and where the doors and windows go, so even a total first-timer can follow along. Or ignore us completely and invent your own: a fort, a maze, a spaceship, a shop, a puppet theater — the magnets don't care.
Want to make it a challenge? Split into two teams and race to finish the same build, or set a theme ("tallest tower that still stands," "coziest den," "longest tunnel") and vote on a winner. Loser makes the snacks. There are no rules except the safety ones below — so grab a pile and start snapping.
Build inspiration
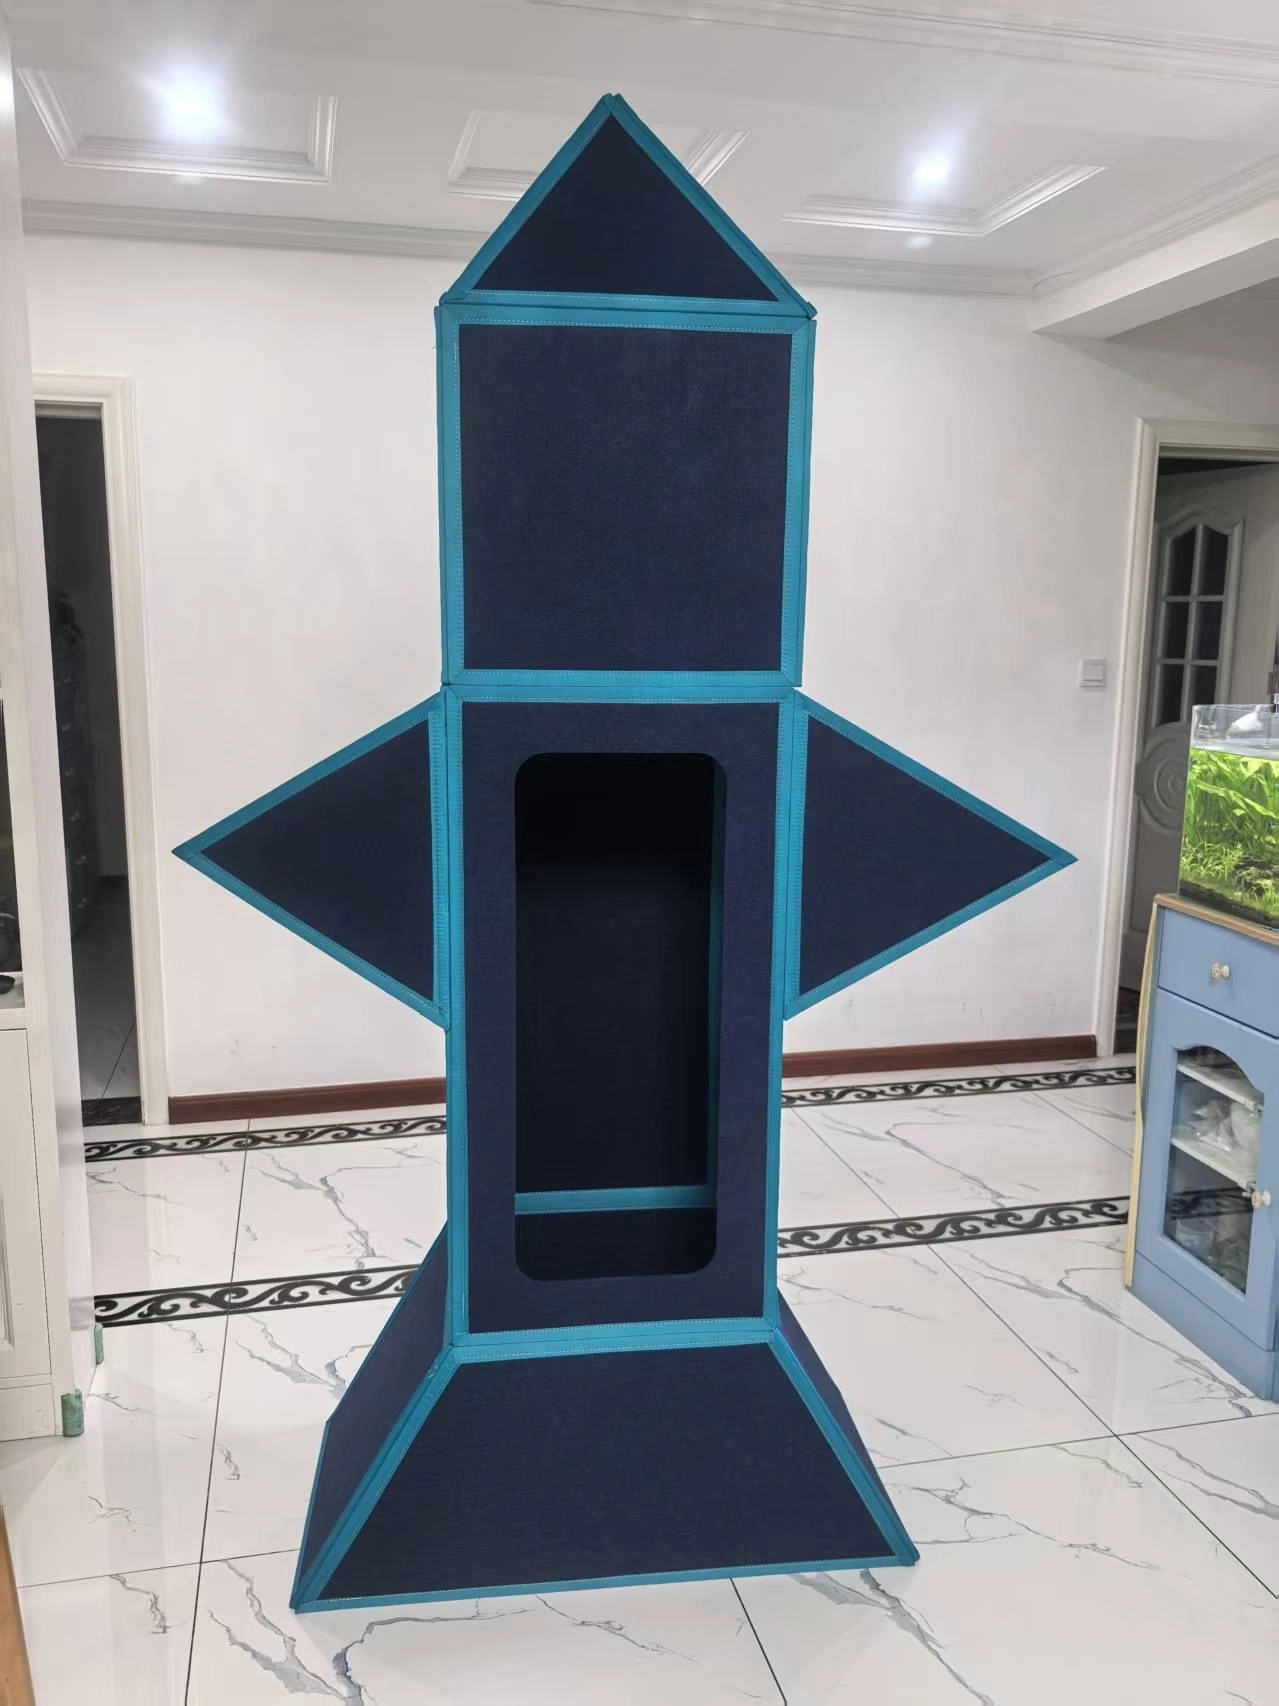
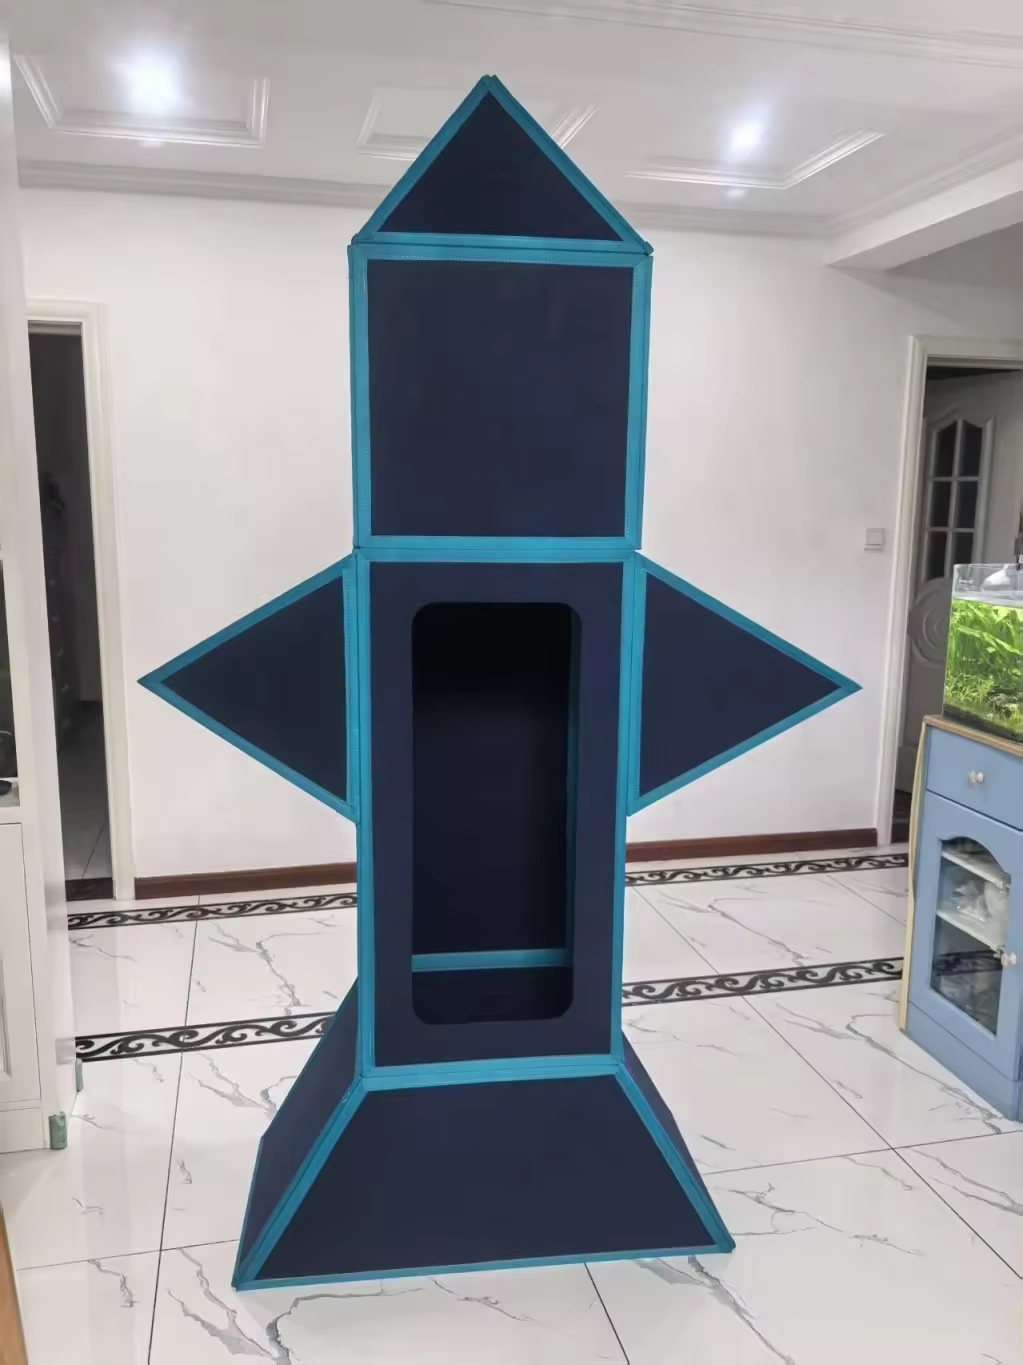
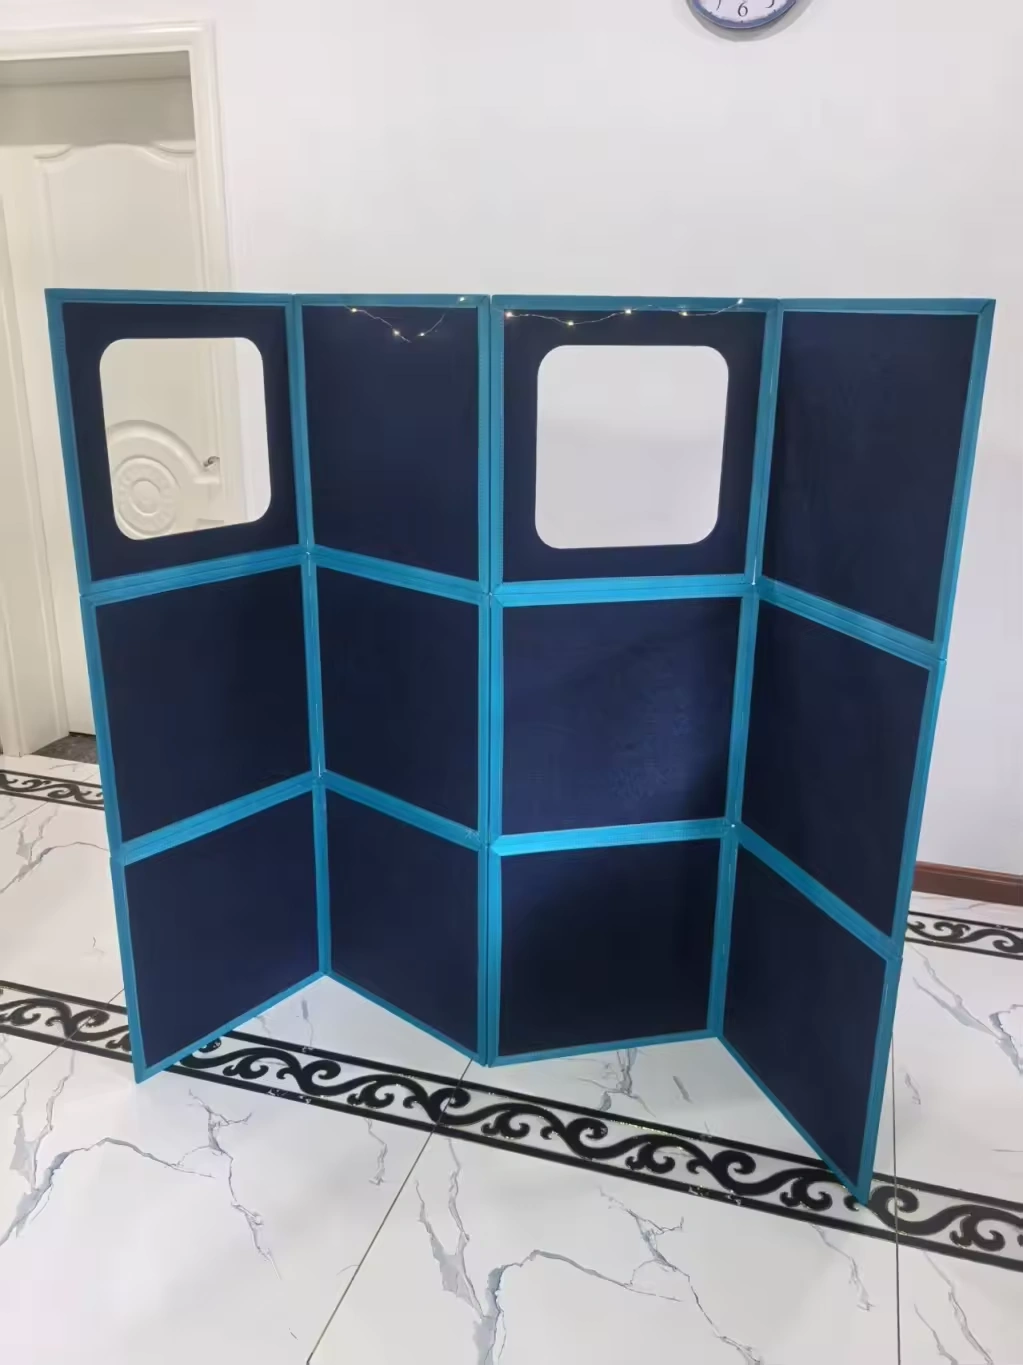
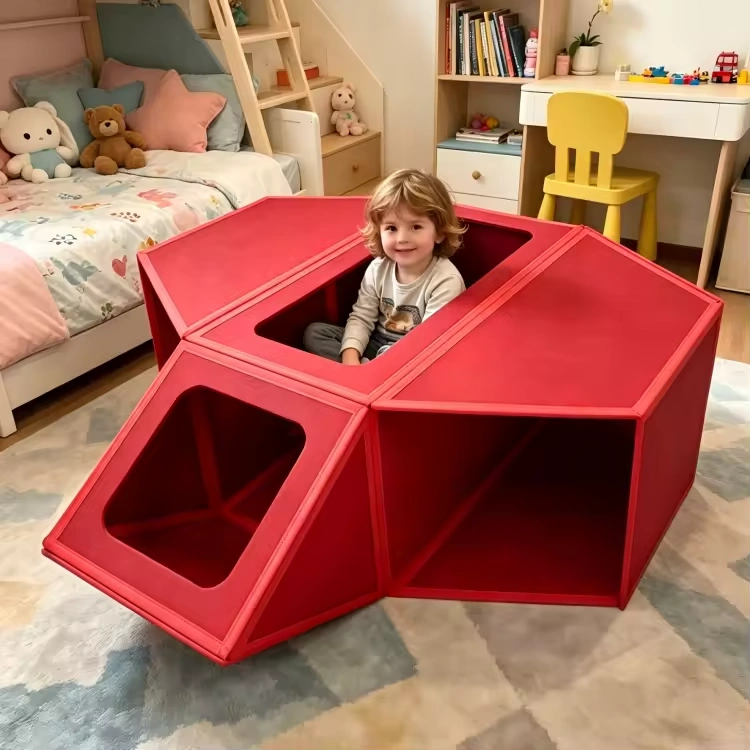
A few builds to spark ideas — a towering rocket, a cabin fort, a cozy den, a big cube fort, and a peek-through lookout wall. Yours can be even wilder.
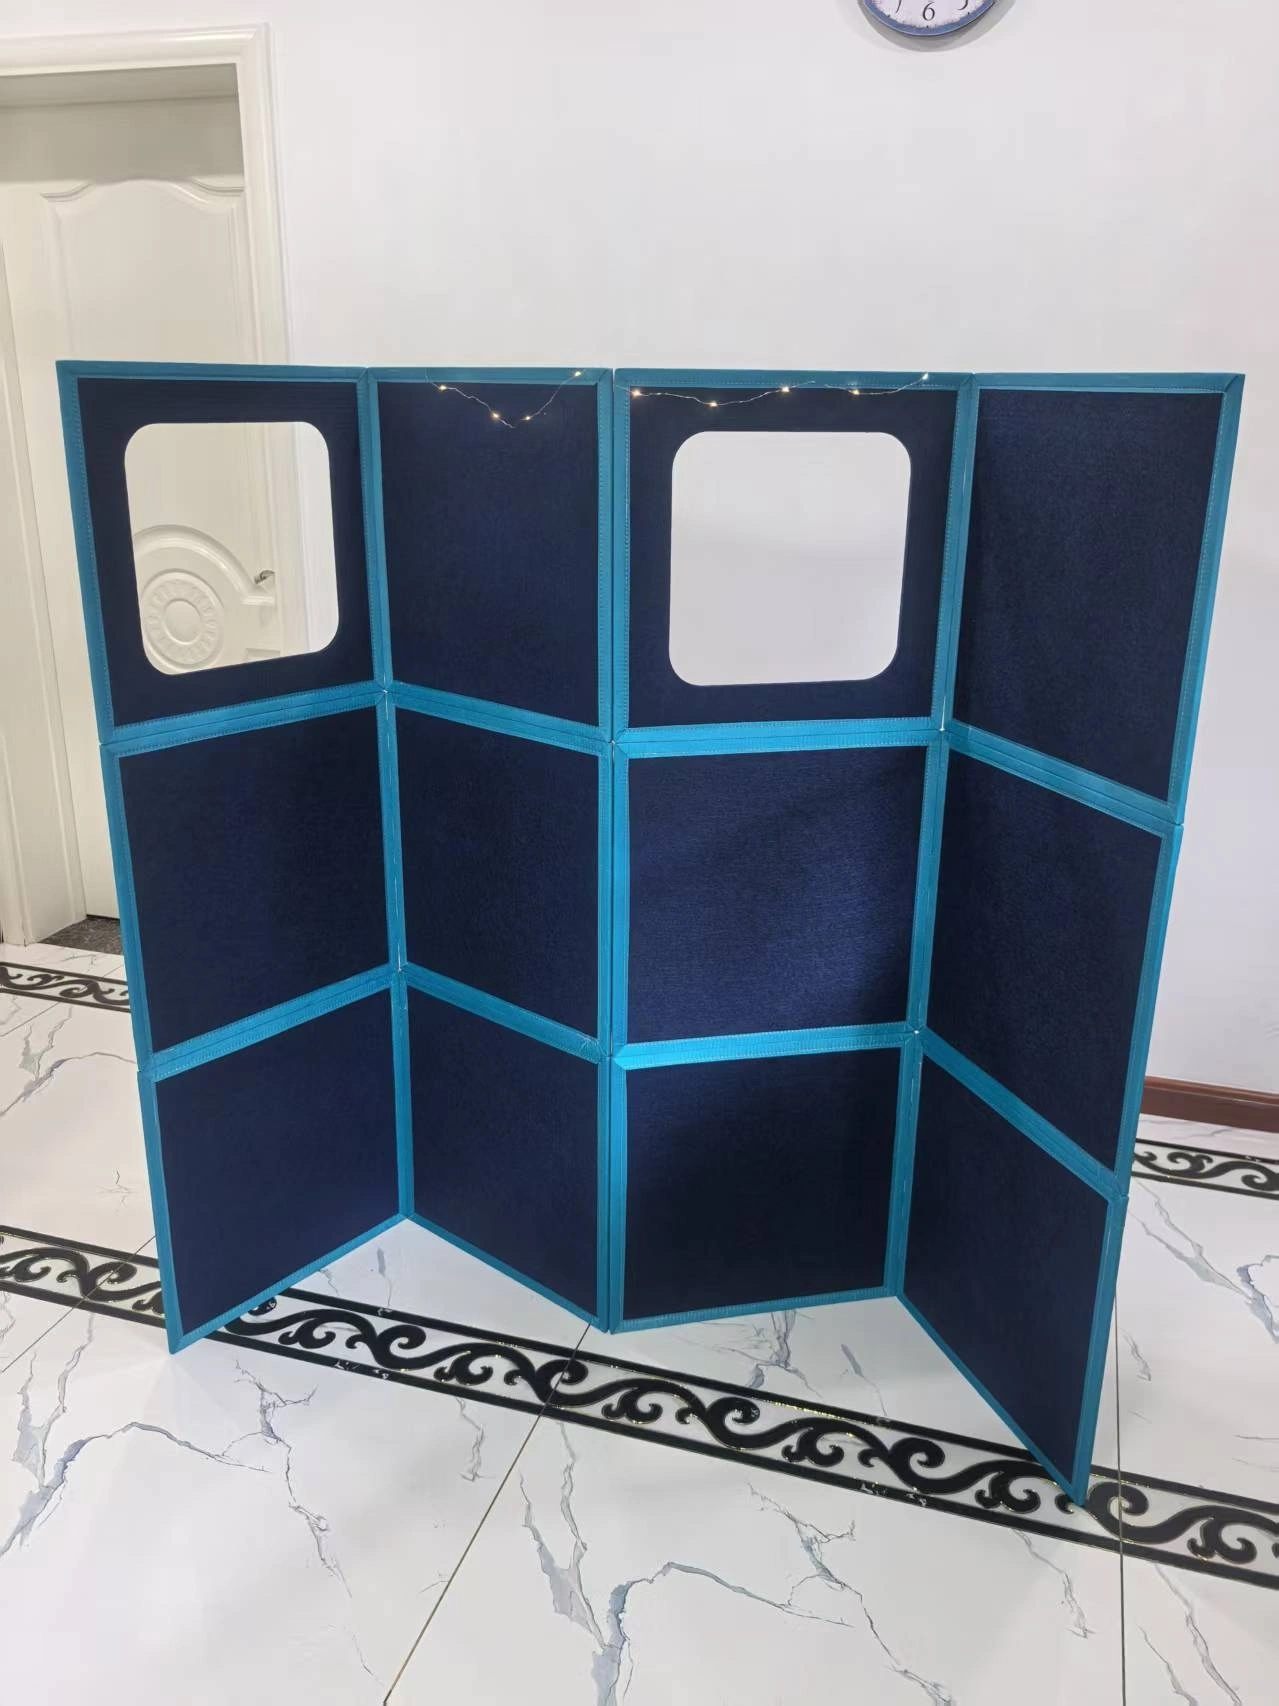
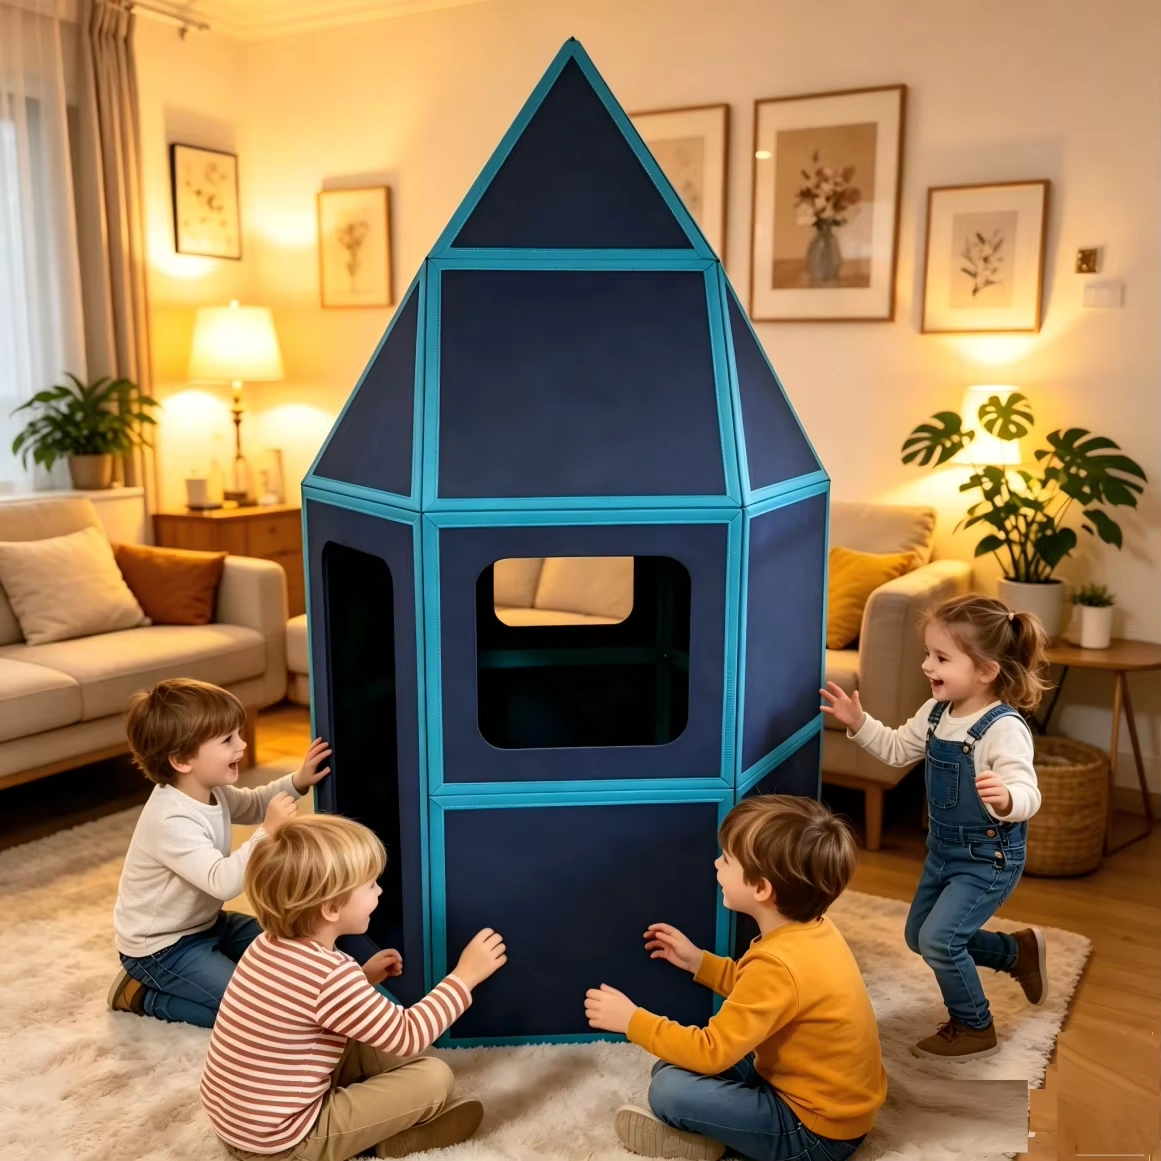
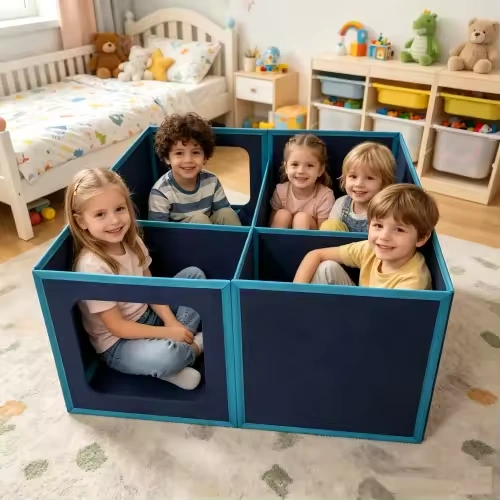
Watch & build along
New to the giant tiles? Watch a build come together first — how the panels snap, stack, and lean into a finished fort — then head to the barn and try it with your crew. Tap a clip to play.


Build it strong — hold up your roof
The panels are light, but nothing can float. A roof has to rest on walls at both ends, and a big or tall roof needs a skeleton underneath — an interior wall, or a post or two — so the middle doesn't sag. Rule of thumb: the bigger or higher you build, the more it needs holding up. Widen the base, brace the corners, and give every span something to rest on. Figuring out how to hold it all up is half the fun.
The 4-Level Build Challenge
Four levels, matched to how many tile sets a build takes — Level 1 = 1 set, Level 2 = 2 sets, and so on up to the big 4-set showpieces. Each level has three challenges: 🟢 Easy, 🟡 Medium, 🔴 Difficult. Build one, tap “Built it!”, and rack up points toward Master Builder. Clear all three in a level to earn its star.
Master-Builder Scoreboard
0 / 5,650 pts
Rank: Rookie Builder
0/12
builds cleared
Tick off each build as your crew finishes it. Progress saves on this device.
First Forts
One 24-tile set. Fast, guaranteed wins for every age — start here.
The Cozy Den
Your very first fort — a snug little cube to crawl into.
A little 20-inch cube you crawl into on hands and knees. Four Squares stand as walls with a fifth laid flat on top as the roof; the ground is the floor. One wall is a Window-Square so a child can peek out, and you leave one wall panel off to make the crawl-in doorway.
How to build it (6 steps)
- 1Pick a flat spot — the ground is your floor, no bottom tile needed.
- 2Stand 2 plain Squares up as two walls, snapping their side edges together at the corner.
- 3Add the Window-Square as the third wall (porthole facing out) and snap it on.
- 4Leave the fourth side OPEN — that gap is your crawl-in door.
- 5Lay the last Square flat across the top as the roof and press the edges down.
- 6Crawl in, wave through the porthole — done!
Level-up challenge: Speed Snap: a grown-up sets a 60-second timer and calls the pieces out one at a time — can you raise the whole den before the buzzer? Then knock it down and beat your own time.
The Bay Lookout Tower
Scan the harbor from your own two-story watchtower.
A two-story square shaft about chest-high that a child crawls into. The bottom ring is three plain Square walls with one side left open as the crawl-in door; the top ring adds two plain Squares and two Window-Square lookout portholes aimed at the bay. Four Triangles lean inward across the very top to make a rough watchtower peak.
How to build it (6 steps)
- 1Build the base ring: stand 3 Squares as three walls in a 20-inch square and snap the corners — leave the fourth side OPEN as your crawl-in door.
- 2Start the top ring directly on the base-ring edges: snap on 2 plain Squares for two upper walls.
- 3Add the 2 Window-Squares as the other two upper walls so the portholes face out toward the water.
- 4Check it's steady and about chest height with a wide base.
- 5Lean the 4 Triangles inward over the open top, each resting on a top edge and tipping toward the center to meet in a rough peak.
- 6Crawl in through the door and keep watch through the portholes!
Level-up challenge: Harbor Watch: a grown-up hides a toy boat out in the yard. You can only spot it through a porthole — call out “Land ho!” when you see it. Bonus: the tower has to stay standing while you lean and look.
The Rocket
Fuel up, climb in, and blast off from your own launch pad.
A chest-high rocket you crawl inside. The body is a two-ring square shaft of six Squares plus two porthole Window-Squares; four Trapezoids lean inward on top as a tapered nose cone that narrows toward the tip. Four Triangles stand as swept fins around the base, and a single Rectangle lies flat as the launch pad.
How to build it (6 steps)
- 1Lay the Rectangle flat on the ground as the launch pad.
- 2Build the lower body ring: 4 Squares in a 20-inch square (leave one lower edge loose as the crawl-in hatch).
- 3Stack the upper ring: 2 Squares plus the 2 Window-Squares so the portholes face out.
- 4Lean the 4 Trapezoids inward over the open top, base-down on the rim, tipping together into a tapered nose cone.
- 5Stand the 4 Triangles as fins around the base — one 20-inch leg flat, the other up the body.
- 6Climb in through the hatch, count down from 10, and blast off!
Level-up challenge: Mission Countdown: a grown-up runs a 3-minute launch clock. One “ground crew” hands up panels while the “pilot” seats each piece — finish the rocket AND buckle in (crawl inside) before zero.
Cabins & Keeps
Two sets, 48 tiles. Now you can get inside it — cabins, a lookout house, and a castle.
The Cabin Fort
A flat-roofed waterman's cabin you climb into and pull the door shut behind you.
A cube-shaped little cabin, 40 inches on each side and one ring (20 inches) tall, with no floor so the barn floor is the floor. The front wall is a single Door-Rectangle you climb through; the back and both sides are pairs of Squares. Two Rectangles lie flat across the top as a solid roof — and needing two Rectangles is exactly what makes this take a second set (a single set has only one).
How to build it (7 steps)
- 1Mark a 40×40-inch square on the floor — two tile-widths on every side.
- 2Stand the back wall: two Squares edge to edge (40 inches wide).
- 3Add the two side walls: two Squares each, snapping to the back-wall corners.
- 4Close the front with the Door-Rectangle so its opening faces out — check all four top edges make a level rim.
- 5Lay the first Rectangle flat across the top, resting on the front and back walls.
- 6Lay the second Rectangle beside it to finish the flat roof.
- 7Climb in through the door and pull an imaginary latch — fort sealed.
Level-up challenge: Beat-the-Tide race: two builders, one set of tiles each, first to seal a weather-tight cabin (all four walls plus the full two-panel roof, no gaps) before a 3-minute “high tide” rolls in wins.
The Harbormaster's House
A two-story lookout house — crawl in the ground floor, spy boats through the upstairs portholes.
A square tower-house, 40 inches on each side and two rings (40 inches) tall, that reads like a Chesapeake harbormaster's lookout. The ground ring has three solid Square walls plus a Door-Rectangle you crawl through; the upper ring stacks directly on top with two porthole Window-Squares on opposite sides for spying boats. A pair of Rectangles caps it as a flat rooftop — and stacking two full wall rings (12 Squares) is what pushes it past a single set.
How to build it (7 steps)
- 1Mark a 40×40-inch square and build the ground ring: back wall = 2 Squares, two side walls = 2 Squares each.
- 2Set the Door-Rectangle as the front wall, opening out — confirm the ground ring is a level box.
- 3Start the upper ring directly on the ground ring's top rim: place the two porthole Window-Squares on opposite walls.
- 4Fill each of those walls with 1 Square beside its porthole, and fill the remaining two upper walls with 2 Squares each.
- 5Check the second ring's top edges line up into a flat rim.
- 6Lay the first Rectangle flat across the rooftop, resting on two opposite top walls; add the second beside it.
- 7Crawl in downstairs and “call the boats” you spot through the upstairs portholes.
Level-up challenge: Harbormaster mission, team of two: one builder owns the ground ring + door, the other owns the porthole ring — the roof only goes on once BOTH rings pass a gentle wiggle-test with no gaps or lean. Bonus 50 imaginary points if the two portholes end up on truly opposite walls (a real lookout sees both up-bay and down-bay).
The Castle Keep
A battlemented keep with four corner towers, arrow-slit windows, and a peaked gatehouse.
A rectangular central keep (40×20-inch footprint, one ring tall, open on top so the battlements can crown it) with a square bump-out tower at each of its four corners, an arrow-slit Window-Square looking out of every tower. The keep's front is a Door-Rectangle gate facing a matching 40-inch Rectangle back wall; the two short sides are single Squares. Twelve Triangles stand point-up along the open top as tooth-gap battlements, and two Trapezoids lean together into a peaked gatehouse over the gate. The four windows and twelve battlement triangles alone push it firmly into two sets.
How to build it (6 steps)
- 1Stand the keep box: the Door-Rectangle gate at the front, a plain Rectangle as the matching back wall (both 40 inches), and one Square closing each short end. Leave the top open.
- 2Build the four corner towers as little square bump-outs that lean on the keep walls — one Window-Square as the outward arrow-slit on each (2 Squares + 1 Window per tower).
- 3Crown the keep and towers with the 12 Triangles, point-up in a tooth-gap-tooth pattern, each leaned slightly inward so none can tip off.
- 4Lean the 2 Trapezoids together over the gate — bases on the front wall's top edge, tops meeting at a ridge — for a peaked gatehouse.
- 5Walk the perimeter and firm up every battlement and tower join.
- 6Send the smallest knight crawling in through the gate to inspect the keep.
Level-up challenge: Siege team relay: split into a Walls squad and a Towers-and-Battlements squad, each with one set of tiles. The keep is only “defensible” when all four arrow-slit windows face outward AND all twelve battlements stand without a single one tipping. Add a 4-minute “the siege is coming” timer for veteran builders.
Harbors & Halls
Three sets, 72 tiles. Whole scenes now — a bunkhouse barn, a lighthouse harbor, a walled fort.
The Great Bunkhouse Hall
One long gable barn for the whole crew to crawl bunk-to-bunk.
A long, simple A-frame barn: two 200-inch walls of stacked Squares run parallel, capped by a peaked roof of Trapezoids leaning together at a single long ridge. Both 40-inch ends are filled with two Triangles apiece — the near one carrying the climb-through door — and three cross-wall dividers inside split the hall into cozy “bunk stalls” to crawl between. Those dividers aren't just for looks: on a ridge this long they're the skeleton that keeps the roof from sagging, so space them evenly and stand them up before you lean the roof on. Its ten roof trapezoids are what push it to three sets (a single set has only four).
How to build it (7 steps)
- 1Mark a 40 × 200-inch rectangle on the floor — the barn footprint (five 40-inch bays).
- 2Stand ten Squares in a row for one long side wall, then ten more for the opposite side.
- 3Close the far end with two Squares; set the Door-Rectangle as the whole near end so kids can crawl in.
- 4Drop in three cross-wall dividers (two Squares each) evenly down the hall to make bunk stalls.
- 5Lean pairs of Trapezoids base-down on opposite eaves so their tops meet in the middle — work down all five bays to raise the full ridge.
- 6Fill each triangular gap at the two ends with two Triangles to close the gables.
- 7Check the ridge line is straight and every trapezoid rests on its wall, then send in the crew.
Level-up challenge: Bunk Brigade relay: split into two teams, one per side wall. Race to raise your ten wall-Squares first — but the roof can't go up until BOTH sides are standing and level, so a team that rushes and topples has to rebuild. First fully-roofed hall with all three bunk dividers wins.
The Harbor Light Station
A lighthouse, the keeper's cottage, and a boathouse — three buildings, one little harbor.
A three-part waterfront scene: a square lighthouse tower rises two rings to a pointed trapezoid cap with two glowing portholes facing the bay; its base shares a wall with a gable-roofed keeper's cottage; and a flat-roofed boathouse tucks off the cottage's side. Each building has its own climb-through door — that's three doors, one more than two sets allow, so it needs three — and kids can crawl tower-to-cottage-to-boathouse without coming out.
How to build it (8 steps)
- 1Build the lighthouse base ring: a 40×40 square of four walls, using a Door-Rectangle as one wall for the entrance.
- 2Stack the lantern ring on top: four more walls, but make the seaward face two Window-Squares so the “light” shows.
- 3Cap the tower with four Trapezoids leaned inward so they taper to a point — the lantern cap.
- 4Against one base-ring wall, build the keeper's cottage: that shared wall is the cottage back; add two side walls and a Door-Rectangle front.
- 5Roof the cottage: lean two Trapezoids into a small ridge and fill each gable end with two Triangles.
- 6Off a free cottage wall, build the boathouse: two side walls plus a Door-Rectangle front, sharing the cottage wall as its back.
- 7Lid the boathouse with two Rectangles side by side, each resting on both long walls.
- 8Point the portholes toward the “bay” and check all three doors line up for a crawl-through tour.
Level-up challenge: Keeper's Rounds: the light only “works” when all three buildings are sealed and the two portholes face the same way (out to sea). Add a 90-second Storm Timer — finish the whole station before the storm hits, or the harbor “goes dark” and the roof crew restarts.
The Bay Watch Fort
A walled bayside fort — gatehouse, two watchtowers, and a battlemented courtyard for the whole crew.
A square bayside fortress: four curtain walls enclose an open courtyard, their tops lined with Triangle battlements like a real parapet. The front wall opens through a climb-in gatehouse, and its two corners rise a second ring into watchtowers — each a small platform with a porthole arrow-slit and a pointed trapezoid cap keeping watch over the bay. Fourteen battlement triangles (two more than two sets allow) and 49 tiles put it squarely in three sets.
How to build it (8 steps)
- 1Lay out an 80 × 80-inch square on the floor — the courtyard footprint (the ground is the floor).
- 2Build the front wall: the Door-Rectangle gatehouse in the center flanked by two Squares.
- 3Build the back and both side walls, four Squares each (all 80 inches, opposite walls matching).
- 4On the two front corners, stack a watchtower platform: a three-wall open-inward box of five Squares plus one Window-Square arrow-slit each.
- 5Cap each watchtower with four Trapezoids leaned inward to a point.
- 6Line the tops of the back, left, and right walls with point-up Triangles (teeth with gaps), leaning each slightly inward — plus two above the gate span.
- 7Sight down every wall to be sure the battlement teeth lean IN and the towers rest square on their corners.
- 8Open the gate and let the garrison crawl in to defend the bay.
Level-up challenge: Garrison team build (best with 4+): split into a Gate crew, a Walls crew, and a Tower crew, each owning their section. Rule of the realm — the fort isn't “defensible” until every wall-top has its battlement teeth AND both towers wear their caps. Optional Siege Timer: raise the whole fort in 5 minutes to “hold the bay.”
Grand Compounds
Four sets, 96 tiles. The whole crew builds one connected showpiece — a harbor village, a stockade, a waterman's compound.
The Watermen's Harbor Village
A friendly little harbor — a crawl-through boardwalk, a lighthouse, and a great hall to open Level 4.
A short crawl-through boardwalk is the little harbor's main street, with just three buildings opening off it: a lighthouse at the head, one windowed great hall, and a single peaked cottage, plus a simple arch at the harbor gate. The lighthouse is two square rings topped by a four-panel taper cone with lit portholes; the great hall is an open-front block with two waterside windows under a trapezoid ridge; and the cottage is a stubby gable. It's the big builds' little sibling — plenty of pieces, but every part is a shape your crew already knows, which is what makes it the gentle way into Level 4.
How to build it (5 steps)
- 1Lay the boardwalk spine: stand two side walls (five Squares each) a crawl-width apart, ends left open, then cap them with two Rectangles and one Door-Rectangle skylight — leave the floor open to crawl through.
- 2At the head of the walk build the lighthouse: a 4-Square base ring, a second ring with two portholes + two Squares, then lean four Trapezoids inward to a point for the cone.
- 3Along one side raise the great hall: an 80-inch back wall (2 Squares + 2 windows), 20-inch gable ends (1 Square + 1 Triangle each), open front onto the walk, then lean four Trapezoids into a ridge.
- 4Add one cottage the same way at 40 inches (back 2 Squares, ends 1 Square + 1 Triangle, open front, two Trapezoid roof slopes).
- 5Finish with the harbor gate: stand the second Door-Rectangle as an arch at the boardwalk mouth and lean a Triangle fin on each side.
Level-up challenge: Boardwalk Test: the harbor isn't “open” until a child can crawl the whole boardwalk from the gate to the lighthouse without a wall wobbling — a gentle first taste of Level 4 teamwork before the bigger builds.
The Grand Bayside Stockade
Four spired towers, a two-story gatehouse, and a walled keep guarding the bay.
A square stockade: four corner towers, each a square ring under a pointed four-panel cone, are linked by five low battlemented curtain walls into a continuous rampart. The front wall swells into a two-story gatehouse with a crawl-through portcullis and a toothed parapet, a smaller sally-port pierces a side wall, and dead-center stands the inner keep — a windowed, flat-roofed block wearing its own crown of battlements.
How to build it (8 steps)
- 1Mark a big square footprint and build the four corner towers first: a 4-Square ring each, wide and stable.
- 2Cap every tower by leaning four Trapezoids inward to a point (a spire cone), keeping the base wide.
- 3Between the towers stand the five 40-inch curtain walls (two Squares each) to close the ring, leaving a gap in the front wall for the gate.
- 4Build the gatehouse in that gap: a 40×20 ring with a Door-Rectangle portcullis in front, a second ring stacked on top, then point-up Triangle battlements.
- 5Cut a sally-port into one side wall with the second Door-Rectangle and tooth it with two Triangles.
- 6Line every curtain wall and the gatehouse top with point-up Triangle battlements, each leaned slightly inward.
- 7Raise the inner keep in the courtyard center: a 40×20 box with two lookout windows, open front, capped by one Rectangle as a flat roof.
- 8Crown the keep's roof edge with four Triangle battlements to finish the stronghold.
Level-up challenge: Hold-the-Wall Timer: the crew has one sand-timer to close the entire ring (four towers + five walls + gate) so there's no gap a “crab raider” can slip through; if any wall section is missing when the timer runs out, that side of the bay is “breached” and must be rebuilt before the keep can be raised.
The Fortified Watermen's Compound
The grand finale short of the Beacon — a spired keep, a walled yard, a crab-shack wing, and a covered dock, all in one.
A waterman's stronghold in four joined quarters: a long windowed great keep under a peaked roof anchors a walled courtyard ringed by three spire-coned towers and one battlemented tower, entered through a gatehouse. Off the keep's gable end huddles a flat-roofed crab-shack wing; a covered dock tunnel with a skylight crawls out to the water past a glass-walled boathouse; and a lone sea-gate arch with leaning buttress fins guards the waterside approach.
How to build it (8 steps)
- 1Build the great keep first as the anchor: an 80-inch windowed box with a Door-Rectangle entrance, 20-inch gable ends (1 Square + 1 Triangle each), then four Trapezoids leaned into a long ridge.
- 2Set the four corner towers around a courtyard off the keep: 4-Square rings, three capped with 4-Trapezoid spire cones and one crowned with four Triangle battlements.
- 3Close the courtyard with the gatehouse (a Door-Rectangle in a 40×20 ring) and two 40-inch curtain walls, then tooth the gate and walls with point-up Triangles.
- 4Tuck the crab-shack wing against the keep's gable end: a small open-front box sharing that wall, roofed with one flat Rectangle.
- 5Run the covered dock tunnel out from the courtyard: two 80-inch side walls, roofed by a Rectangle plus a Door-Rectangle skylight, ends left open to crawl through.
- 6Beside the dock stand the glass boathouse: a window-walled open-front box with a single flat Rectangle lid and two Triangle battlements on its edge.
- 7Plant the sea-gate at the water's approach: the last Door-Rectangle as an arch with a leaning Triangle fin on each side.
- 8Walk the whole compound: crawl in the gate, through the courtyard, into the keep, and out the dock tunnel to the boathouse to confirm every module connects.
Level-up challenge: Master Builder Run: the biggest build short of the all-five-set Bayside Beacon. Split into four Guilds (Keep, Towers, Docks, Walls) that must hand off shared walls to each other; the compound only “earns its charter” when a child can crawl a continuous path — gate → courtyard → keep → dock tunnel → boathouse — without a break, and all three spire cones stand.
Earn your builder badge. Snap a photo of each finished build before you take it apart and tag @thebaysideescape — or drop it on the Memory Wall in your guest hub. We feature the best builds of the season.
The Season Leaderboard
Finished a build? Snap a photo, add your crew's name, and get on the board. Every approved build banks its points — climb the ranks against the other families who've stayed this season.
No crews on the board yet — yours could be first.
Add your build
Snap it, name your crew, and share it.
Built something great? Share a photo of it on Instagram or Facebook, tag @thebaysideescape, and keep it up for 14 days — we'll convert your leaderboard points into up to $100 in Bayside Credit toward your next stay.
- Your post should show your build and tag @thebaysideescape.
- Required: in the post, clearly disclose that you earned booking credit — add #ad (or "I earned booking credit for this") where it's easy to see.
- Credit lands after we verify it and it stays up 14 days. One per crew per season, redeemable on a direct booking.
- Bayside Credit is a booking discount — no cash value, non-transferable, and it expires 12 months after it's issued.
Paste the link to the post itself (not your profile), so we can confirm it stays up.
By submitting you agree to the Bayside Credit terms & rules.
Full step-by-step guides
Want every panel spelled out? Here are the classic builds in full detail — the den, the tunnel, the cabin fort, the rocket, the castle, and the all-five-set showpiece.
The Cozy Den
A snug little crawl-in cube — your family's first magnetic-tile win in about five minutes.
What you'll grab
How to build it
- 1Clear a flat floor space about 2 feet by 2 feet — carpet or a rug is perfect and quiet. Lay 1 Square flat on the ground. This is the FLOOR of the den.
- 2Stand 1 Square up on edge along the BACK of the floor tile. Let the magnets grab — you'll feel it snap. Hold it a second until it settles. That's your back wall.
- 3Stand a 2nd Square up on the LEFT edge of the floor so its side edge meets the back wall's side edge. They snap together into a corner. That's the left wall.
- 4Stand the Square-with-Window up on the RIGHT edge of the floor, snapping it to the back wall the same way. Now you have three walls and a floor — and the FRONT is left wide open. That open front is the crawl-in door.
- 5Lay the last Square flat across the TOP as the roof. Gently lower it so all three wall tops catch the magnets at once. Give it a tiny wiggle so it sits level.
- 6Done! Peek through the window, invite a small explorer to crawl in through the open front, and watch the magic land. Want it cozier? Drape a light blanket over the roof.
Pro tips
- Snap slowly — let the magnets do the pulling instead of forcing tiles together. Kids love the little 'click' feeling.
- If the roof feels wobbly, press each wall firmly down onto the floor tile first so the base is solid, then set the roof.
- Point the open door away from walls and furniture so there's a clear runway to crawl in.
- Want it a touch taller inside? Keep it a single cube — stacking is for bigger, wider builds, not this cozy one.
- This is the perfect first build to hand to a 3–5 year old: let them snap the last wall or lay the roof so the win is THEIRS.
Adult supervises the whole time. This is a crawl-IN, sit-inside den — it is not for climbing on or standing on, and the roof will not hold weight, so keep kids off the top. The magnets are strong: hold loose tiles by the flat face, not the edges, so little fingers don't get pinched when two edges snap together. Keep the den low (a single cube) and on soft flooring, and stay close with toddlers who might try to pull it over onto themselves.
Why the pieces add up
A closed cube has 6 faces = 6 squares (floor + 4 walls + roof). For a crawl-in den we OPEN one wall as the doorway, which removes 1 square: 6 − 1 = 5 tiles. Those 5 = 1 floor + 3 walls + 1 roof. We make one of the 3 walls a Square-with-Window so a child can peek out (4 plain Squares + 1 Window-Square = 5). The fourth wall stays off entirely — that gap IS the crawl-in door. All 5 tiles fit easily in one set (caps: 10 squares, 2 window-squares).
Great for
Ages 3–6 and the grown-up building alongside them. The gateway build: a fast, guaranteed win that teaches everyone how the edges snap together before moving on to barns, tunnels, and peaked-roof houses.
The Tunnel Run
A crawl-through magnetic tunnel with a skylight porthole on top — link two for a long-run adventure.
What you'll grab
How to build it
- 1Pick a flat, clear floor with a couple of feet of space all around — you want room to crawl in and out both ends. Clear the middle of the run so it stays a smooth crawl path.
- 2Build the FIRST side wall: stand 2 squares up on their edges, end to end in a straight line, so their vertical edges snap together into one long wall 40" long and 20" tall. The magnets grab as they get close — let them click, don't force them.
- 3Build the SECOND side wall the same way with 2 more squares, standing it parallel to the first, about 20" apart (roughly one square's width). This gap is the crawl space, so keep it wide enough for the biggest crawler.
- 4Lay the roof across the top: take the Rectangle-with-Door/Window (40") and rest it flat across both walls so its long edges snap down onto the top edges of the two walls. Position it so the big opening sits UP toward the sky — that hole is your porthole/skylight, just like Photo A.
- 5Gently press each spot where the roof meets a wall so all the magnet edges are seated. Give the whole box a soft wiggle to confirm it stands on its own before anyone goes near it.
- 6Leave BOTH ends open — those are the tunnel mouths. Now it's ready: crawl in one end, wave up through the porthole, crawl out the other end!
- 7LINK IT LONGER (2 sets): build a second identical module (4 more squares as two walls) right up against the first so the open ends meet and the walls line up into one continuous 80" run. Cap the second module with the plain Rectangle (40") as a solid roof. Now you have a long tunnel with a skylight over the first half and a cozy covered second half.
Pro tips
- Keep the two side walls one square-width apart (about 20") so even the biggest kid — or a game grown-up — can crawl through comfortably.
- The porthole is half the fun: station someone outside to pop a stuffed animal or a 'hello!' down through the skylight while a kid crawls underneath.
- If a roof panel slides, nudge the walls slightly closer together so the roll of the roof's magnets grip more of the wall's top edge.
- For the long 2-set run, line up the two modules BEFORE dropping the second roof on — it's much easier to straighten the walls while the top is still off.
- Make it a car wash or a train tunnel: drape a light blanket over one end for a 'door', or push toy cars through end to end.
This is a low, crawl-through build — the safest kind — but keep an adult nearby the whole time. This tunnel is for crawling THROUGH, never for climbing ON or sitting on top: the roof is a light fabric-over-frame panel, not a load-bearing lid, and it will drop if a child leans or climbs on it. The porthole is a large climb-through-sized opening — it is a skylight to peek and wave through only, NOT an entry: never let a child climb into it or step down through it, because that will collapse the roof onto whoever is inside. Supervise toddlers closely so the open crawl space stays clear and no one gets bumped by the porthole edge. The magnets are strong — when you snap walls and roof together, keep little fingers off the joining edges so they don't pinch, and hand loose panels flat rather than letting them swing into place.
Why the pieces add up
A tunnel is a rectangular tube with the floor left open so kids crawl on the ground: it needs a TOP + TWO SIDE WALLS. Each module covers one 40" rectangle length (= two 20" squares long). SIDE WALLS: each wall is 40" long and 20" tall, and a square is 20"×20", so it takes 2 squares per wall × 2 walls = 4 squares per module. TOP: one 40" panel spans the whole module = 1 rectangle-type panel per module. ONE module (1 set) = 4 squares + 1 door-rectangle (opening faces up = the porthole) = 5 panels; well under the 1-set caps (10 squares, 1 door-rect). TWO modules linked (2 sets) = (4 squares × 2) + 1 door-rectangle roof + 1 plain-rectangle roof = 8 squares + 1 door-rect + 1 rect = 10 panels; under the 2-set caps (20 squares, 2 rect, 2 door-rect). Ends are left open on purpose — those open squares are the crawl-in and crawl-out.
Great for
Toddlers and younger kids who love to crawl, hide, and peek — plus a fast, low-stress first build for the whole family to do together on day one of the trip. Easy to link longer as confidence grows.
The Cabin Fort
A flat-roofed cabin big enough to sit inside, with one big climb-through door — the rock-solid "get inside it" build for the whole family.
What you'll grab
How to build it
- 1Clear a flat floor space about 4 ft × 4 ft (a big rug is perfect). Decide which direction the front door will face — you'll want room to crawl in and out. The bare floor becomes the floor of your cabin, so no panels go underneath.
- 2Build the FRONT wall first: stand the single Door-Rectangle panel (40" wide, with the big climb-through opening) on its long edge. This one panel is your entire front and your doorway. Have one person hold it upright.
- 3Build the BACK wall: stand 2 Squares side by side (edge to edge) directly across from the front, about 40" away — the same width as the Door-Rectangle. Snap the two back squares to each other so they act as one 40"-wide wall.
- 4Add the two SIDE walls: for the left side, stand 2 Squares in a row (edge to edge) connecting the left edge of the front Door-Rectangle to the left edge of the back wall; let the magnets grab at both ends. Do the same on the right side with the other 2 Squares. You now have four walls forming a closed 40" × 40" room you can already sit inside. Press each wall-to-wall corner so every seam is snapped tight, and make sure all four walls are vertical.
- 5Lay the flat ROOF: take the 2 Rectangles. Rest the first one flat across the top, so its two 40" ends sit on the top edge of the FRONT wall and the top edge of the BACK wall — it is now supported on both ends. Let the magnets grab along the wall tops. Lay the second Rectangle right beside it the same way, covering the other half, and snap the two rectangles to each other along their long edge. The roof is now a solid, fully-supported 40" × 40" lid.
- 6Walk around and firm up every seam: press the four wall corners and run a hand along both roof edges and the center roof seam so every magnet is locked. Then send a kid (or a brave adult) crawling through the front door to test-sit inside. Optional finishing touch: before the roof goes on, swap one back or side wall square for a Square-with-Window so light and little faces can peek out.
Pro tips
- This build is genuinely easy and mostly one- or two-person friendly, but an extra pair of hands helps hold the front Door-Rectangle steady while the first side wall snaps on.
- If the roof rectangles won't sit flat, your walls may be leaning in or out — straighten all four walls to vertical first so their top edges form a level 40" × 40" rim for the roof to rest on.
- Point the front door AWAY from foot-traffic so nobody kicks the Door-Rectangle while someone is crawling through.
- Want it bigger or taller? Go 2 squares long × 3 squares wide, or add a second course of squares to raise the walls — but keep the roof spans to a single 40" Rectangle each (never leave a roof panel unsupported in the middle), and re-check you're inside 2 sets before adding panels.
- Build toward the center of your space, not against furniture — you'll want to reach all four sides to lay the roof on from outside.
Adult supervision required throughout, especially the roof stage where a rectangle can slide before it's snapped down — keep hands and heads clear until the lid is locked. This is a sit-INSIDE fort, not a climb-ON one — never let kids climb on, sit on, or stand on the walls or roof; it is fabric-over-frame and will collapse under weight. Keep the build to its natural one-square-tall (about 20") sit-in-it height and do NOT stack it taller or add weight on top of the flat roof. The edge magnets are strong: hold loose panels by the flat face, not the edges, so snapping panels don't pinch fingers — keep toddlers back while two people are joining big panels. Only one child inside at a time until everyone's confident it's stable, and keep the front doorway clear so anyone inside can crawl out easily.
Why the pieces add up
Footprint = 2 squares long × 2 squares wide = 40" × 40", walls 1 square (20") tall, and the ground IS the floor (no floor panels — this is a fort you climb into). WALLS (perimeter, four 40"-wide sides, each 40" = two 20" squares): FRONT is ONE Door-Rectangle (40" wide = two 20" squares, single climb-through opening); BACK = 2 squares; LEFT = 2 squares; RIGHT = 2 squares. Wall total = 6 squares + 1 door-rectangle. ROOF: a flat 40" × 40" lid = 2 Rectangles (each 40" × 20") laid side by side. Each rectangle is 40" long and rests on the top edges of the front wall and the back wall, so it is supported on BOTH ends — the maximum unsupported span is 0 (the panel spans exactly wall-to-wall, which is its own 40" length). TOTALS: 6 squares, 1 door-rectangle, 2 rectangles = 9 panels. Inventory check against 2 sets (20 squares, 2 door-rectangles, 2 rectangles available): 6 ≤ 20 ✓, 1 ≤ 2 ✓, 2 ≤ 2 ✓ (uses both rectangles).
Great for
The whole family together — it's the flagship "we built a fort and we're all sitting in it" moment, and it's simple and sturdy enough that little kids can help lead. Great for ages 3-10+ (little ones hand up panels and crawl through the door; older kids and adults set the walls square and lay the roof). Perfect rainy-vacation-afternoon bonding build, a reading nook, a puppet-show stage, or a cozy hideout for story time.
The Rocket
A crawl-in rocket ship with a tapered nose cone and swept-back fins — stack it tall, plant it wide, and count down to blast-off.
What you'll grab
How to build it
- 1Clear a flat floor space about 6 feet across — the fins will stick out, so give the rocket room. Lay the 1 Rectangle (40"x20") flat on the floor. This is your launch pad; the rocket stands in the middle of it.
- 2Build the BOTTOM RING (the body's first storey). Stand up 4 tiles on their edges in a square tube, one square foot of floor in the center: use 3 Squares for the back and two sides, and 1 Square-with-Window for the FRONT — that window is your crawl-in hatch. Snap each corner edge-to-edge so the four walls hold each other up in a box with no top and no bottom.
- 3Add the FINS NOW, while the tube is still short and easy to steady — the wide base is what keeps the finished rocket from tipping, so put it on before you build tall. Take the 4 Triangles. Stand one against the bottom ring with one 20" leg flat on the floor pad and the other 20" leg pressed up the wall so its magnets grab; the slanted ~28" hypotenuse sweeps back like a rocket fin. Repeat on all four sides. Press each fin's foot flat to the floor. Feel how much steadier and wider the base is now.
- 4Build the TOP RING (second storey) right on top of the first, now that the base is braced. Stand 4 more tiles on the top edges of the bottom ring: 3 Squares plus 1 Square-with-Window. Put this porthole on a DIFFERENT side than the hatch below, so the rocket has windows facing two ways. Press each top tile down onto the ring below so the magnets grab.
- 5Check the whole tube: give it a gentle wiggle. With the fins on, the two-ring body should stand solid and open at the very top, ready for the nose.
- 6Time for the NOSE CONE — and this is where the tapered Trapezoids do the work. Take the 4 Trapezoids. Stand the first one on one top edge of the upper ring so its slanted side rests on the 20" edge and the panel leans INWARD, wide part low and narrow 20" edge up high. Do the same with a trapezoid on each of the other three top edges.
- 7Lean all 4 Trapezoids inward until their narrow 20" top edges come together — because each panel tapers from wide to narrow, they close into a pointed nose that shrinks toward the top, just like a real rocket cone. The slanted side edges snap to each other and lock. If a panel keeps sliding, have one person hold the opposite one while you close them up two at a time.
- 8Stand back and check the cone sits square on the ring and the fins are splayed wide. This is the lesson: the wide finned bottom is what lets the tall body and pointed nose stand up without tipping.
- 9Blast off! Count down from 10 together, then let a smaller kid crawl in through the front hatch and wave out the porthole. Decorate with a countdown chant or a paper flag if you like.
Pro tips
- Put the fins on BEFORE you build the second ring and the nose — a wide base early makes every later step steadier, and you never have to close the nose cone on top of a tippy un-braced tube.
- The nose cone is the fiddly bit: close the 4 trapezoids two-at-a-time with a helper holding the far side, instead of trying to balance all four at once. Remember the narrow 20" edges go UP and meet in the middle.
- Put the hatch window low and the porthole high on opposite sides so a kid can crawl in one face and peek out another.
- If the rocket feels tippy, spread the triangle fins so their floor legs point straight out and press them flat — the farther the feet reach, the steadier it stands.
- Want it TALLER? This build only uses 17 of your 24 tiles. You have spare squares to add a third body ring — but if you do, keep the top no higher than a standing adult can easily reach, and this build is at its cap of 4 trapezoids and 4 triangles, so don't try to widen the nose or add more fins from a single set.
Adult supervision required the whole time. This is a tall build, so keep it to about chest height for the kids (the two-ring body plus nose is plenty) and put the fins on WIDE and EARLY for stability so it can't topple. This is a crawl-INTO and look-at rocket, never a climb-ON one — do not let children stand, hang, or lean on the tower or pull up on the nose cone, and keep the area around the fins clear so nobody trips on a splayed foot. The magnets are very strong: hold panels by their faces, not their edges, and watch little fingers when two tiles snap together so they don't pinch. Keep toddlers back while the tall rings are being stacked and while the nose cone is being closed overhead.
Why the pieces add up
A rocket = a tall square TUBE + a tapering NOSE CONE, standing on a WIDE finned BASE. Cross-section is one tile square (20"x20"), so each horizontal ring of the tube needs 4 vertical walls (front, back, left, right). Stack 2 rings for height: 2 rings x 4 walls = 8 wall panels. Swap 2 of those 8 plain squares for window-squares (a low crawl-in hatch and a high porthole) -> 6 Square + 2 Square-with-Window = 8 body panels. NOSE CONE: cap the top square opening with 4 TRAPEZOIDS, not triangles. Each trapezoid has a 40" long base, a 20" short top, and slanted sides. Stand each trapezoid so its slant sits on one 20" top edge of the ring and it leans INWARD; because the trapezoid tapers from wide to narrow, the four of them close into a pyramid-like nose that narrows toward the top — a true rocket taper. (Why not the right triangles here? A right isosceles triangle is L-shaped with sides 20/20/28.3 and CANNOT form a symmetric square-based point — the faces of a square pyramid must be isosceles with equal upper sides, which these triangles are not. The trapezoids, which genuinely taper, are the correct nose piece.) FINS: the 4 right TRIANGLES become swept fins. A right triangle stands beautifully as a fin — one 20" leg flat on the floor, the other 20" leg magnetized up the bottom-ring wall, and the ~28" hypotenuse as a raked, swept-back leading edge. Four of them give a wide, stable footprint. FLOOR: 1 Rectangle (40"x20") laid flat underneath the tube. Total = 6 + 2 + 4 + 4 + 1 = 17 tiles. Per-set caps checked: squares 6<=10, window-squares 2<=2, trapezoids 4<=4, triangles 4<=6, rectangle 1<=1. Fits in ONE set with room to spare.
Great for
A countdown-to-blast-off adventure that teaches kids why a wide finned base keeps tall things from tipping — perfect for a mixed-age crew where a grown-up steadies the tube while kids press on the fins, close the tapered nose cone, and crawl inside to be the astronaut.
The Castle Keep
A stand-inside rectangular keep with four corner towers, a crawl-through gate, and a whole ridgeline of triangle battlements — the big group build where everyone gets a wall.
What you'll grab
How to build it
- 1Clear a big flat floor space — this build is roughly the size of a card table and everyone needs room to walk around it. Sort your piles: 10 plain Squares, 4 Window-squares, 12 Triangles, 2 Trapezoids, 1 plain Rectangle, and 1 Door-Rectangle. Give each kid a job (wall-holder, tower-builder, battlement-crew).
- 2Build the keep — a long rectangular room in the middle, 40" x 20". Stand the Door-Rectangle up as the FRONT wall (your gate) and the plain Rectangle up as the BACK wall — both are 40" wide so they face each other. Then close the two short ends with 1 plain Square on the left and 1 plain Square on the right. Snap all the vertical edges together so the four walls hold each other up in a rigid box. Leave the top and floor open. That's 2 Squares + 1 Rectangle + 1 Door-Rectangle.
- 3Add the first tower. Pick a spot near one corner and build a little box that leans on ONE keep wall: stand 2 plain Squares out from the keep to make an L, then close the box with 1 Window-square as the outward face (arrow slit!). The keep wall it leans on is the tower's fourth side, so it snaps right on. That's 2 Squares + 1 Window-square.
- 4Repeat the same tower three more times, one near each of the other corners. Each is 2 plain Squares + 1 Window-square sharing one keep wall. After all four you've used 8 Squares and all 4 Window-squares — a fat tower bulging out near every corner.
- 5Crown the towers and walls with battlements. Set Triangles point-UP standing along the open top edges — a tooth, a gap, a tooth. Spread all 12 Triangles around the tops of the four towers and the keep walls so it reads like a real rampart. They tack magnetically onto the top edges (and lean each one slightly inward so it can't tip off).
- 6Build the gatehouse peak over the door. The top edge of the Door-Rectangle is already your lintel, so lean the 2 Trapezoids together right above the gate — long bases resting on the front wall's top edge, tops meeting at a ridge — to make a little peaked porch roof over the entrance. That's 2 Trapezoids.
- 7Walk the whole castle once, pressing every seam so the magnets are fully snapped. Check the gate opening is clear to crawl through. Then send the smallest knight in through the gate to inspect the keep from inside — and take the team photo.
Pro tips
- Assign one person per tower — four kids building four towers at once turns a slow build into a race and everyone owns a piece.
- If a tower feels wobbly, it's usually one seam not fully snapped — run a thumb down every vertical edge and press.
- No triangle should stand totally alone on a top edge — give each one a neighbor tooth or lean it slightly inward so it doesn't tip off.
- This build sits right at the 2-set limit for window-squares and triangles, so having a 3rd set on hand gives you spare pieces if one goes missing or you want a second ring of crenellations.
- Point all four arrow-slit windows the same way (all facing 'out') for a tidy look, or all facing the play area so kids can peek out.
Adult supervision throughout — these panels are big and the magnets are strong, so keep fingers clear of the edges where two panels snap together to avoid pinches, especially with toddlers around. This is a CRAWL-INSIDE and PEEK-THROUGH castle, not a climbing frame: keep it one panel tall, build the towers WIDE against the keep for stability, and do not let kids climb on, pull up on, or stand on any wall or battlement — the triangle crenellations on top will slide off if grabbed. Only small children should crawl through the gate, gently, while an adult steadies the front wall.
Why the pieces add up
KEEP (central RECTANGULAR hall, 40" x 20" footprint, standing one panel tall, open top so battlements can crown it, open floor so kids stand inside). A box needs opposite walls the SAME width, so a 40"-wide door wall must face a 40"-wide back wall: FRONT (40") = Door-Rectangle, BACK (40") = plain Rectangle, LEFT + RIGHT sides (20" each) = 2 Squares. That is 2 Squares + 1 Rectangle + 1 Door-Rectangle, and it closes into a rigid 40x20 tube. (The original 'square keep from 3 Squares + 1 Door-Rectangle' is impossible: a 40" door wall cannot meet a 20" back wall.) TOWERS (four bump-out towers, one near each corner): each tower is its own little box that borrows ONE keep wall as a shared face and adds 3 NEW panels to close — the outward-facing new panel is a Window-square (arrow slit) and the other two are plain. Per tower = 2 Squares + 1 Window-square. Four towers = 4x2 = 8 Squares + 4x1 = 4 Window-squares. (Note: these are honest bump-out boxes sharing one keep wall, not true corner towers — a true corner already supplies two sides.) BATTLEMENTS: triangles set point-up along the open top edges = 12 Triangles (roughly 3 crowning each tower/keep run). GATEHOUSE PEAK over the door: the Door-Rectangle's own top edge is the lintel, so lean the 2 Trapezoids together above it, long bases resting on the front wall top, tops meeting at a ridge = 2 Trapezoids (no separate flat span needed). TOTALS: Squares 2+8=10; Window-squares 4; Triangles 12; Trapezoids 2; Rectangle 1; Door-Rectangle 1. CHECK vs 2-set caps (20 sq / 4 window / 12 tri / 8 trap / 2 rect / 2 door): 10<=20, 4<=4, 12<=12, 2<=8, 1<=2, 1<=2 — all within inventory (window-squares and triangles sit exactly at the 2-set cap, so a 3rd set is worth having for spares).
Great for
A rainy-afternoon team build where every kid and grown-up gets their own tower or wall to own — big enough to crawl inside, dramatic enough for a knights-and-dragons photo, and sturdy enough to leave standing for a whole day of pretend play.
Keeper's Point: The Bayside Beacon
A whole crew builds one connected showpiece — a lighthouse tower, a keeper's cottage, and a crawl-through harbor tunnel — big enough to pile inside together.
What you'll grab
How to build it
- 1PLAN THE FOOTPRINT ON THE FLOOR. Clear a run about 12 feet long. The layout is a straight line: LIGHTHOUSE TOWER at one end, KEEPER'S COTTAGE in the middle, and the HARBOR TUNNEL running off the cottage's side. Split your crew into three teams — one per module — and they'll all snap together at the end.
- 2COTTAGE FIRST (it's the anchor everything connects to). Stand the two long walls: each is 3 squares wide × 2 high (6 panels per side, 12 total). Snap panels edge-to-edge into two long fences, then stand them parallel about 2 panels (40") apart. Slot 1 window-square into each long wall wherever the kids want a porthole.
- 3CLOSE THE COTTAGE ENDS. Back end: a 2-wide × 2-high wall = 4 squares. Front end: put the DOOR-RECTANGLE across the bottom (it spans the full 2-wide base — that's your walk-in door) and 2 squares across the top above it. Snap all four corners of the box together so it stands on its own.
- 4CAP THE COTTAGE WITH A GABLE ROOF. Each end wall is 40" wide, so it takes TWO triangles to fill each gable peak — set 2 TRIANGLES against each end wall, points meeting up at the center to make a full triangular peak (4 triangles total). Then lean 2 TRAPEZOIDS up each long side (wide base down at the wall top, side-by-side along the length) so they rise to meet at the center ridge. The two slopes lean on each other like a tent. That's the classic barn roof from Photo B.
- 5BUILD THE LIGHTHOUSE TOWER (Team 2, in parallel). Make a square box: 4 walls, 2 tiles high. Use plain squares for the bottom ring (4) and the back of the top ring (2), and the 2 WINDOW-SQUARES facing front on the top ring — that's the glowing lantern room. Keep it just 2 high (about chest height) so it stays rock-steady.
- 6PUT THE PEAKED ROOF ON THE TOWER. Lean the 4 TRIANGLES inward over the square top so their edges kiss and meet in a rough peak — these are right triangles, so expect a slightly craggy cap rather than a perfect pyramid; nudge until all four edges touch and it self-supports. Slide the finished tower up against one end wall of the cottage so they share a wall and become one building.
- 7BUILD THE HARBOR TUNNEL (Team 3, in parallel). Lay a floor of 3 squares end-to-end (60" long, 20" wide). Stand a wall of 3 squares along each long side of the floor, about 20" apart. You now have a 3-panel-long open trough you can crawl through.
- 8ROOF THE TUNNEL. Lay the 3 RECTANGLES (40×20) flat across the tops of the two walls, side by side, to make a long solid ceiling (each overhangs the narrow tunnel a little on both sides — that's fine and fully supported). At the FAR end, lean 1 TRIANGLE into the 20"-wide opening to cap it with a little peak (a fun window to wave out of).
- 9JOIN EVERYTHING. Slide the open entrance-end of the tunnel against the cottage's side wall, and set the DOOR-RECTANGLE as the grand archway where they meet so you can crawl from the tunnel straight into the cottage. Press every seam so the magnets grab firmly.
- 10FINAL WALK-AROUND + DECORATE. Walk the whole Beacon and press any loose seams. Use leftover panels for a flag on the tower, a front porch, or a dock. Now do the maiden voyage — an adult goes first to test that every panel is snug before any child crawls inside.
Pro tips
- Assign each team a module and a color of edges to grab — it turns the build into a friendly race, and everyone finishes around the same time.
- Build the cottage box fully square and press all four corners BEFORE adding the roof — a true 60"×40" base makes the trapezoid slopes meet cleanly at the ridge.
- The roof slopes hold each other up by leaning together at the ridge; if one side slides, the other will too. Seat both slopes at once with two people, one per side.
- Remember each gable end needs TWO triangles to fill the full 40" width — one triangle only covers half and leaves a hole.
- Keep the tower to 2 panels high on purpose. It looks tall next to the low tunnel, stays stable, and nobody's tempted to climb it.
- You've only used 53 of 120 pieces — spare squares make a great fenced 'keeper's yard,' and spare trapezoids make a second little A-frame boathouse off the tunnel.
- Snap panels into flat 'fences' on the floor first, then tip whole walls upright — far easier than building standing up, panel by panel.
Adult supervision throughout, and an adult should crawl through first to confirm every panel is snug before any child goes inside. This is a crawl-in / sit-in structure only — do NOT let kids climb ON it, stand on the roof, or sit on top; the tunnel roof and cottage gable are made to be looked at and crawled under, not weight-bearing. The tunnel interior is snug (~20" wide) — send one small child through at a time and never let a child back up into a jam; keep the far-end peak clear as an exit sightline. Keep the tower to about chest height (2 panels) and wide-based for stability so it can't topple, and set it against the cottage wall so it can't tip. The magnets are strong: hold loose panels by the flat faces, not the edges, and keep little fingers clear of seams as they snap — supervise toddlers closely around the pinch points. Give the whole build a gentle shake-test before the maiden crawl.
Why the pieces add up
Three connected modules, all counts derived from the shape and kept inside the 5-set caps (≤50 sq, ≤10 win-sq, ≤30 tri, ≤20 trap, ≤5 rect, ≤5 door-rect). MODULE 1 — LIGHTHOUSE TOWER (a square shaft with a leaned peak cap). A four-sided shaft, kept low at 2 tiles high for stability = 4 faces × 2 = 8 wall panels. Swap the top ring's two front panels for window-squares (the glowing 'lantern room') → 6 squares + 2 window-squares. Roof: the pieces are right triangles (legs 20/20, hyp ~28"), so 4 of them cannot form a perfectly symmetric pyramid over the 20"×20" top — instead they LEAN inward, edges kissing, into a rough peaked cap. Still 4 triangles. Tower = 6 sq + 2 win-sq + 4 tri. MODULE 2 — KEEPER'S COTTAGE (gable house, Photo B). Footprint 3 panels long × 2 wide (60"×40"), 2 tiles high. Long sides: 2 × (3×2) = 12 squares. End walls: 2 × (2×2) = 8, but the front end's bottom row becomes the door (40'' door-rectangle spans the 2-wide base) → that end = 2 squares (top) + 1 door-rect; back end = 4 squares. Ends = 6 sq + 1 door-rect. Walls = 12 + 6 = 18 sq + 1 door-rect; swap 2 squares for windows → 16 sq + 2 win-sq + 1 door-rect. GABLE FILL: each end wall is 40" wide (2 panels), and a triangle's base leg is only 20", so it takes 2 triangles to fill each gable peak → 4 triangles. ROOF: the ridge is ~60" long; trapezoids (40" base) lay base-down at the eave, side-by-side up each slope. Two trapezoids per slope span the ~60" ridge (with a small eave overhang) and tile cleanly = 4 trapezoids meeting at the ridge. Cottage = 16 sq + 2 win-sq + 4 tri + 4 trap + 1 door-rect. MODULE 3 — HARBOR TUNNEL (crawl-through connector, Photo A/C). A 3-long box you crawl through: two side walls 3×1 = 6 squares, a floor 3×1 = 3 squares → 9 squares (interior ~20" wide — a snug single-child crawl). Roof = three 40×20 rectangles laid across the 20"-wide tunnel (each overhangs ~10" per side, fully supported) = 3 rectangles. Grand entrance = 1 door-rectangle arch at the cottage end. The far end is only 20" wide (1 panel), so a single triangle (20" base) exactly caps it into a peak = 1 triangle. Tunnel = 9 sq + 3 rect + 1 door-rect + 1 tri. GRAND TOTAL = 31 sq + 4 win-sq + 9 tri + 4 trap + 3 rect + 2 door-rect = 53 pieces. Every category is comfortably under the 5-set inventory (31/50, 4/10, 9/30, 4/20, 3/5, 2/5).
Great for
A rainy-day team challenge for the whole family on vacation — big kids build the roofs, little ones crawl the tunnel, and everyone piles inside for a photo when the Beacon lights up.
A few ground rules
A few real ground rules so everyone stays smiling. An adult should always be around while the tiles are in use — these are big panels and the magnets are genuinely strong, so keep loose edges from pinching little fingers as they snap together, and keep an extra-close eye on toddlers. Most important: these forts are for crawling INSIDE, not climbing ON. Please don't let anyone stand or climb on top of a structure — the panels are light and will give way, not hold weight. If you're building something tall like a tower, rocket, or castle, keep it to about chest height and build wide at the base for stability; a short, sturdy build beats a tall, wobbly one every time. And when you're done playing, do a quick sweep of the barn and gather every panel back up so none go missing.
When you're done
Cleanup is easy — that's the beauty of these panels. They're only about 9mm thick, so they stack completely flat, like a big deck of oversized cards. When you're finished, take your build apart gently (peel edges apart rather than yanking), and stack the panels by shape as you go. Then do a quick count back to 5 complete sets: 50 squares, 10 window-squares, 30 triangles, 20 trapezoids, 5 rectangles, and 5 door-rectangles — 120 panels in all. Give the barn one last look for any stray tiles that wandered off, tuck the stacks back where you found them, and you're done. Thank you for helping keep every set complete for the next family!
Built something amazing?
Snap a photo before you take it apart — we'd love to see it. Tag @thebaysideescape or leave it on the Memory Wall in your guest hub.